•About Me
- Jenni
- My name is Jenni. I've been PSPing for a few years now & I love it! Been with my boyfriend since 2004. Our animals are our children at the moment. Hope you enjoy my tutorials!
•Labels
- Aguila Dorado (3)
- Akkasshaa (2)
- Al Rio (1)
- Alex Prihodko (2)
- Alexander McMillan (8)
- Amy Matthews (2)
- Andrea Ale (1)
- Andy Cooper (6)
- Anna Marine (1)
- Arthur Crowe (11)
- Barbara Jensen (1)
- blogger (1)
- Carpe Diem (1)
- CDO (4)
- Celinart (5)
- custom (1)
- Danny Lee (10)
- Dark Yarrow (1)
- Dees'Sign Depot (1)
- Di_Halim (5)
- Dran Design (2)
- Elias Chatzoudis (10)
- English Rose Designs (1)
- Exclusive (1)
- FTU (13)
- Gary Rudisill (6)
- GraphFreaks (4)
- Heartfelt Perfections (4)
- Ismael Rac (12)
- Jamie Kidd (1)
- Jay Trembly (1)
- Jennifer Janesko (1)
- Jose Cano (6)
- Justice Howard (1)
- Kaci McVay (1)
- Kate Miller (1)
- Keith Garvey (9)
- Kizzed By Kelz (1)
- Lady Mishka (4)
- layout (1)
- Marc Duval (1)
- Mark Wasyl (2)
- Martin Abel (3)
- Misticheskaya (15)
- Natalia NZ (1)
- No Scraps (1)
- Pandora Creations (7)
- PFD (1)
- Pin-Oops (6)
- Pinuptoons (5)
- PTU (199)
- S&CO (46)
- Screaming Demons (2)
- Scripting (1)
- Sebastien Serrano (5)
- Serg Grafik (1)
- Skullified Scrapz (6)
- SkyScraps (3)
- Snowbunny (1)
- Sonia Roji (1)
- Spazzd Art (8)
- The Hunter (11)
- Toriya (3)
- TPP (1)
- Tyson McAdoo (1)
- Verymany (8)
- wishlist (1)
- Zlata_M (7)
I Do Very Bad Things - PTU
21:34 | Posted by
Jenni |
Edit Post
that have a working knowledge of PSP.
Supplies needed:
PSP 8 (Any version will work)
Tubes of choice
I used the beautiful artwork of Ismael Rac.
To purchase a license to use his artwork, please visit his new store
Tag template by Missy. You can get it from her blog here. Thanks Missy!
Scrap kit by Kristin called Cute But Bad
available for purchase at Scraps With Attitude. Thanks Kristin!
Sparkles of choice. Sorry I can’t share mine
Font of choice. I’m using Sick Capital Vice
Filters:
Eye Candy 4000 – Gradient Glow
Penta.com – VTR2
Lets get started
Open Missy’s template
Image – canvas size – 700 x 700
We can crop and resize later
Close off copyright layer
Select glittered circle. Add dropshadow of choice. I used 2-2-40-4
Select small circle1 – selections – select all – float – defloat – new raster layer
Flood fill with color to match tube – select none
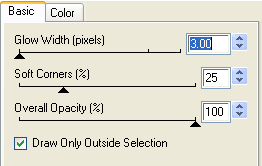
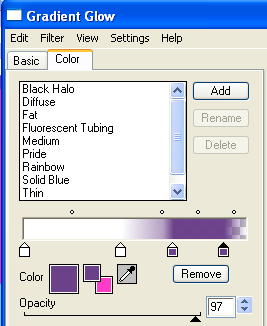
Effects – plugins – Eye Candy 4000 – Gradient Glow
Repeat dropshadow
Hide small circle1 layer

 Repeat for small circle2
Right click on rectangle2 – merge – merge down
Selections – select all – float – defloat – paste paper of choice into selection
Select none
Effects – plugins – Eye Candy 4000 – Gradient Glow – same settings as above
Repeat Gradient Glow with another color from tube
Hide rectangle2 layer
Select frame background – selections – select all – float – defloat
Copy and paste paper of choice – selections – invert – press delete
Keep selected. Copy and paste tube of choice – position – delete
Duplicate tube. On duplicate – adjust – blur – Gaussian blur – radius 3.00
Change blend mode of duplicate tube to overlay
Effects - plugins - Penta.com - VTR2 - default settings
Change blend mode of original tube to Luminance (L)
Hide frame background layer
Repeat dropshadow to frame
Select wordart
Effects – plugins – Eye Candy 4000 – Gradient Glow
Same settings as above
Add elements of choice from kit
I added beaded string, butterfly 1, and glitter
Apply dropshadow of choice to elements
I used 2-2-40-4
Copy and paste tube of choice – arrange to the right
Duplicate – adjust – blur – Gaussian blur – radius 3.00
Change the blend mode to overlay
Dropshadow original tube layer
Add name and proper copyright info
Crop and resize tag if needed
Save as .png
Thanks for trying my tutorial.
I hope you enjoyed it.
Can’t wait to see your results!
This tutorial was written on April 10, 2010 by Jenni.
Any resemblance to any other tutorial is purely coincidental.
Supplies needed:
PSP 8 (Any version will work)
Tubes of choice
I used the beautiful artwork of Ismael Rac.
To purchase a license to use his artwork, please visit his new store
Tag template by Missy. You can get it from her blog here. Thanks Missy!
Scrap kit by Kristin called Cute But Bad
available for purchase at Scraps With Attitude. Thanks Kristin!
Sparkles of choice. Sorry I can’t share mine
Font of choice. I’m using Sick Capital Vice
Filters:
Eye Candy 4000 – Gradient Glow
Penta.com – VTR2
Lets get started
Open Missy’s template
Image – canvas size – 700 x 700
We can crop and resize later
Close off copyright layer
Select glittered circle. Add dropshadow of choice. I used 2-2-40-4
Select small circle1 – selections – select all – float – defloat – new raster layer
Flood fill with color to match tube – select none
Effects – plugins – Eye Candy 4000 – Gradient Glow
Repeat dropshadow
Hide small circle1 layer

 Repeat for small circle2
Right click on rectangle2 – merge – merge down
Selections – select all – float – defloat – paste paper of choice into selection
Select none
Effects – plugins – Eye Candy 4000 – Gradient Glow – same settings as above
Repeat Gradient Glow with another color from tube
Hide rectangle2 layer
Select frame background – selections – select all – float – defloat
Copy and paste paper of choice – selections – invert – press delete
Keep selected. Copy and paste tube of choice – position – delete
Duplicate tube. On duplicate – adjust – blur – Gaussian blur – radius 3.00
Change blend mode of duplicate tube to overlay
Effects - plugins - Penta.com - VTR2 - default settings
Change blend mode of original tube to Luminance (L)
Hide frame background layer
Repeat dropshadow to frame
Select wordart
Effects – plugins – Eye Candy 4000 – Gradient Glow
Same settings as above
Add elements of choice from kit
I added beaded string, butterfly 1, and glitter
Apply dropshadow of choice to elements
I used 2-2-40-4
Copy and paste tube of choice – arrange to the right
Duplicate – adjust – blur – Gaussian blur – radius 3.00
Change the blend mode to overlay
Dropshadow original tube layer
Add name and proper copyright info
Crop and resize tag if needed
Save as .png
Thanks for trying my tutorial.
I hope you enjoyed it.
Can’t wait to see your results!
This tutorial was written on April 10, 2010 by Jenni.
Any resemblance to any other tutorial is purely coincidental.
Labels:
Ismael Rac,
PTU
Subscribe to:
Post Comments (Atom)


0 comments:
Post a Comment