•About Me
- Jenni
- My name is Jenni. I've been PSPing for a few years now & I love it! Been with my boyfriend since 2004. Our animals are our children at the moment. Hope you enjoy my tutorials!
•Labels
- Aguila Dorado (3)
- Akkasshaa (2)
- Al Rio (1)
- Alex Prihodko (2)
- Alexander McMillan (8)
- Amy Matthews (2)
- Andrea Ale (1)
- Andy Cooper (6)
- Anna Marine (1)
- Arthur Crowe (11)
- Barbara Jensen (1)
- blogger (1)
- Carpe Diem (1)
- CDO (4)
- Celinart (5)
- custom (1)
- Danny Lee (10)
- Dark Yarrow (1)
- Dees'Sign Depot (1)
- Di_Halim (5)
- Dran Design (2)
- Elias Chatzoudis (10)
- English Rose Designs (1)
- Exclusive (1)
- FTU (13)
- Gary Rudisill (6)
- GraphFreaks (4)
- Heartfelt Perfections (4)
- Ismael Rac (12)
- Jamie Kidd (1)
- Jay Trembly (1)
- Jennifer Janesko (1)
- Jose Cano (6)
- Justice Howard (1)
- Kaci McVay (1)
- Kate Miller (1)
- Keith Garvey (9)
- Kizzed By Kelz (1)
- Lady Mishka (4)
- layout (1)
- Marc Duval (1)
- Mark Wasyl (2)
- Martin Abel (3)
- Misticheskaya (15)
- Natalia NZ (1)
- No Scraps (1)
- Pandora Creations (7)
- PFD (1)
- Pin-Oops (6)
- Pinuptoons (5)
- PTU (199)
- S&CO (46)
- Screaming Demons (2)
- Scripting (1)
- Sebastien Serrano (5)
- Serg Grafik (1)
- Skullified Scrapz (6)
- SkyScraps (3)
- Snowbunny (1)
- Sonia Roji (1)
- Spazzd Art (8)
- The Hunter (11)
- Toriya (3)
- TPP (1)
- Tyson McAdoo (1)
- Verymany (8)
- wishlist (1)
- Zlata_M (7)
Hot Girl
12:00 | Posted by
Jenni |
Edit Post

This tutorial is written for those
that have a working knowledge of PSP.
Supplies needed:
PSP X2 (any version will work)
Tube of choice
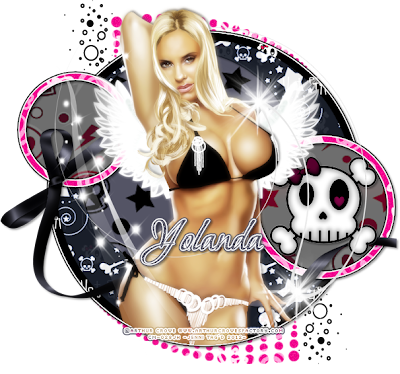
I used the beautiful artwork of Arthur Crowe
To purchase a license to use his artwork, please visit ACF
Scrapkit by Eclipse Creations called Hot Girl
available for purchase at SATC
Circle Template 2 by Melissa
available at Creative Misfits Creations
Font of choice. I'm using Bonheur Royale
Filters:
Eye Candy 4000 - Gradient Glow
Let's get started
Open Melissa's template & delete copyright layer
Close off raster 9
Select raster 5 - selections - select all - float - defloat
Open paper 3 & copy/paste
Selections - invert - delete - select none
Close off original layer
Select merged layer - selections - select all - float - defloat
Open paper 5 & copy/paste
Selections - invert - delete - select none
Close off original layer
Select raster 4 - selections - select all - float - defloat
Open paper 6 & copy/paste
Selections - invert - delete - select none
Add gradient glow & dropshadow of choice
Close off original layer
Select raster 3 - selections - select all - float - defloat
Open paper 1 & copy/paste
Selections - invert - delete - select none
Close off original layer
Select raster 7 - selections - select all - float - defloat
Open paper 2 & copy/paste
Selections - invert - delete - select none
Change blend mode to overlay
Repeat for raster 2
Select raster 1 - selections - select all - float - defloat
Open paper 5 & copy/paste
Selections - invert - delete - select none
Add gradient glow & dropshadow of choice
Open bow & copy/paste
Position to bottom left
Add dropshadow of choice
Open skull & copy/paste
Position in right circle & dropshadow
Copy/paste tube as new layer
Duplicate - adjust blur - gaussian blur - 3
Change blend mode to screen - 71% opacity
Add dropshadow to original tube
I added the white angel wings behind my tube
This part is optional
Open sparkle 5 & copy/paste
Open sparkle 3 - rotate 90 left - copy/paste
Add name & proper copyright info
Crop & resize tag if needed
Merge visible & save as .png
This tutorial was written on February 26, 2012 by Jenni
Any resemblance to any other tutorial is purely coincidental
Labels:
Arthur Crowe,
PTU
Subscribe to:
Post Comments (Atom)


0 comments:
Post a Comment